 When we think of the Divi Blog module, we usually think of the blog page.However, Divi’s Blog module includes features that can help you build a variety of pages.Posts for Current Page is an option inside the Blog module dynamically displays posts.In this article, we’ll look closely at Posts for Current Page and see what it does and how to use it.
What is the Posts for Current Page Option?
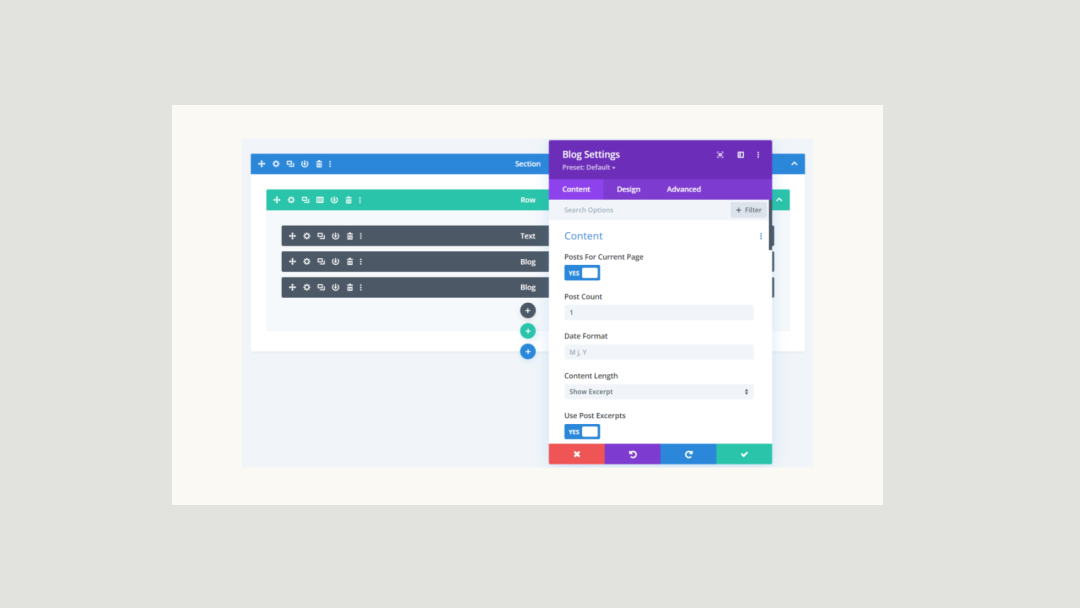
Posts for Current Page is an option inside the Content section of the Blog module.
It’s disabled by default.When enabled, a few of the options within the module change.
The module normally includes an option to choose the Post Type.This includes Pages, Posts, Media, and Projects.
It will also include custom post types if you have any.
It also normally has an option called Included Categories.
This gives you a list of your categories so you can select those you want the module to display.This includes All Categories, which will display posts from every category regardless of the category the page is for.
Another option is Current Category.This displays posts from the category the user selected.
Enabling Posts for Current Page disables the Post Type and Included Categories options.
This allows Divi to dynamically make the selections for you.If you use this with dynamic content, it will display posts from the category that’s selected.This is similar to Current Category, but it’s broader.
Posts for Current Page works great with Archive Templates in the Divi Theme Builder.It also works well for templates assigned to specific posts, such as a certain tag.
Using the Posts for Current Page Option with a Blog Template
We’ll build a simple Archive page template that demonstrates how it works.This template will include a title and two blog modules.To create the Archive Page template, go to Divi > Theme Builder in the WordPress dashboard.
Select Add New Template.
Assign to All Category Pages
A modal will open with lots of options where the template will be assigned.Under Use On, scroll down to Archive Pages and select All Category Pages.
Click Create Template at the bottom of the modal.This will open the editor where we’ll create the template.
Create the Category Template
Select Build Custom Body.For reference, I’m using the fonts and colors from the free Category Page Template for Divi’s Blogger Layout Pack and creating a layout from scratch.You can also use it as your template and follow along with the modules I’m adding.
Style the Section
First, open the Section’s settings by clicking on the blue gear.
Scroll down to Background and add the color #fbf9f4.
Close the Section’s settings.
– Background Color: #fbf9f4
Add a Row
Click on the green icon and add a one-column Row.
Create a Dynamic Title
Next, add a Text module to the Row.
For the Body content, select Use Dynamic Content.
This opens a list of options where you can select the dynamic content to display.Select Post Categories.
Close the next set of options.We’ll use the default settings.
Next, go to the Design tab.Change the Text to Vidaloka and the Color to #161616.
Set the Desktop Font Size to 80px and click on the Phone icon to set the Phone Font Size to 60px.Change the Line Height to 1.15em.Close the Text module’s settings.
– Font: Vidaloka
– Color: #161616
– Size: 80px, 60px
– Line Height: 1.15em
Add the First Blog Module
Next, we’ll add the first of two Blog modules.This one will show a featured post, while the others will provide a blog feed based on the page content.
Select Posts for Current Page
First, enable Posts for Current Content.
Enter 1 for the Post Count.
– Posts for Current Content: Yes
– Post Count: 1
Style the First Blog Module
Elements
Scroll down to Elements and disable Show Pagination.We’ll use this for the second Blog module.
– Show Pagination: No
Background
Scroll down to Background and change the color to rgba(255,255,255,0).
– Grid Background: rgba(255,255,255,0)
Title Text
Next, go to the Design tab.Change the Layout to Fullwidth.This will work as our featured post in the hero area.Disable the Overlay.
– Layout: Fullwidth
– Overlay: Off
Next, scroll to Title Text.Use Vidaloka for the Font and change the color to #161616.Change the Line Height to 1.4em.
– Font: Vidaloka
– Color: #161616
– Line Height: 1.4em
Meta Text
Scroll down to Meta Text and change the color to #e2c29d.
– Color: #e2c29d
Spacing
Next, go to Spacing and change the Top Margin to 0vw.This keeps the module from overlapping the title.
– Top Margin: 0vw
Box Shadow
Lastly, go to Box Shadow and disable it.
Now, you can close this module and we’ll clone it for the second module.
– Box Shadow: None
Add the Second Blog Module
Now, duplicate the first module and open its settings.This Blog module will display the blog feed.We’ll start with its settings, add a few more, and make some changes.
Content
Change the Post Count to 6 and the Post Offset Number to 1.
– Post Count: 6
– Post Offset: 1
The Post Offset setting tells Divi the number of posts to skip.Starting with the newest post, Divi counts the number of posts and starts at the number of the offset.We need this because we’re already displaying a post in the featured Blog module.
Elements
Scroll down to Elements and enable the Read More Button and Pagination.
– Read More Button: Yes
– Pagination: Yes
Style the Second Blog Module
Next, go to the Design tab.Since we’ve copied the module that we already styled, we’ll only need to style the elements that the module didn’t use.
Under Layout, change it to Grid.
– Layout: Grid
Read More Text
Scroll to the Read More Text settings.Change the Font to Vidaloka and the Style to Underlined.
– Font: Vidaloka
– Style: Underlined
Change the Text Color to #161616, the Size to 16px, and the Line Height to 1.8em.
– Text Color: #161616
– Size: 16px
– Line Height: 1.8em
Pagination Text
Go to the Pagination Text and change the Font to Vidaloka and the Color to #161616.
– Font: Vidaloka
– Color: #161616
Lastly, scroll to Border and change the Rounded Corners to 0px.Close the module and save your page template.
– Rounded Corners: 0px
Posts for Current Page Results
Now, when I click on a category, I’ll see an archive page with posts for that page.
The Title, featured blog post, and blog feed all display the content dynamically based on the category selected.The second Blog module has an offset of 1.
This is my Engineering category.I have two posts in that category.
For demonstration, I’ve gone back to my first module and disabled Posts for Current Page, and set it to All Categories.I’ll also increase the size of the Meta Font so it’s easier to see.
Now, the first Blog module displays the latest post in All Categories and the second Blog module displays a blog feed dynamically based on the category selected.Notice, the second module still starts at the second post in the Education category because of the offset.
I’ve now reinstated Posts for Current Page for the first Blog module, and the page now only shows the content dynamically based on the category selected by the user.
Another Example – Posts for Current Page Based on Tags
Let’s look at one more example.I’ve gone back to the template and assigned the dynamic title to Post Tags.When the user clicks on a tag link, the template will now display posts with that tag.
I’ve set the title to dynamically show the tags for this tags archive page.No categories are selected.
I’ve removed the featured post to make this easier to see.
I’ve selected the archive page for the Software Engineering tag.This tag is applied to the posts in my Engineering and Data Science categories.The title displays the tag correctly.However, the posts are from all my categories.
I want it to only show posts with this tag.
I don’t want to show posts by their category.Instead, I want to show posts by their tags.We can’t choose categories and we can’t choose tags.
Posts for Current Page is our best option.
It doesn’t care what the categories are.It only cares about the dynamic relationship between the posts.
Since this is a tags archive page, it will dynamically look at the tags.
My Tags Archive page now only shows posts with the correct tags.
And, just to demonstrate the point, it isn’t getting the dynamic tag from the title.I’ve removed the title in the example below.Divi gets the dynamic information from the tag archive page itself.
Ending Thoughts
That’s our look at understanding the Posts for Current Page option inside the Divi Blog module.It’s simple to use and gives you more control over archive pages.
Since it’s dynamic, this option is much broader than using categories.
We want to hear from you.Do you use Posts for Current Page inside your Divi Blog module? Let us know in the comments..